Technical Specifications
MAX Working load : 15Kgs
Tilt angle: ±25°
Rotation angle: 360°
Length: 5 in (127.7 mm), 15.9 in (402.7 mm) – 22.7 in (577.7 mm), spaced 1 in (25 mm) apart
Material: Steel/Aluminium alloys
Mount Weight : 1.76KGs
PCM128EXT Diagram
PCM128EXT Dimensions
Before Starting Your Installation :
Make sure to assemble this product according to the instructions. Failure to do so might result in personal injury or property damage.
Never operate this product if parts are missing or damaged.
Ceiling structures vary, and it’s important to make sure that the type of ceiling structure and mounting hardware that you’re using will properly support the mounted equipment. Failure to do so may result in personal injury and/or equipment damage. The ceiling structure should be capable of supporting at least four times the weight of the mounted equipment.
The mounting hardware included with this product might not be adequate for some ceiling structures. If you lack the necessary expertise to attach this product to the ceiling structure that you’re using, contact a construction professional to install the ceiling mount or to provide specific mounting instructions for your ceiling structure.
Requirements
- Pencil
- Drill and drill bits
- Hammer
- 8mm Spanner
- 10 mm Spanner
- Cross Head Screwdriver
PCM128EXT – Contents
Mounting the Projector Mount
1. Before mounting the ceiling bracket, remove the ceiling bracket cover to reveal the mounting holes. The ceiling bracket cover comes apart in two pieces, by pulling each sides of the ceiling bracket cover away from the ceiling bracket.
2. Mount the ceiling bracket to the ceiling using the mounting screws (x 4) included or the appropriate hardware.
3. When the ceiling plate is installed in a ceiling, slide both pieces of the ceiling plate cover back over top of the ceiling plate, snapping them together.
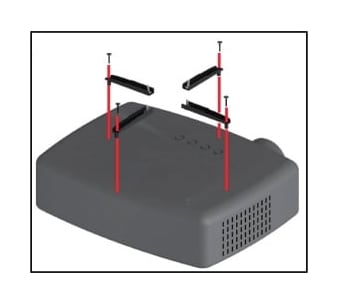
4. Align the mounting arms with the mounting holes on the top of the projector.
5. Select the appropriate installation screws (M3 x 24 mm, M4 x 24mm, M5 x 24 mm, or M6 x 24 mm).
6. Insert the selected installation screws (x 4), through the mounting holes in the mounting arms and into the mounting holes on the projector.

7. Using a Phillips head screwdriver, tighten the installation screws. Be careful not to over-tighten.
8. Align the screws on the mounting arms with the appropriate cut-outs on the projector plate.
9. Insert the screws on the mounting arms through the cut-outs in the projector plate.
11. Place the projector plate cover over the projector plate.
12. Align the protrusions on the bottom of the ball-joint mechanism with the slots in the top of the projector plate cover.
13. Insert the protrusions into the slots and rotate the ball joint mechanism clockwise until it locks into place.
14. Insert one of the M6 x 12 mm screws into the lock screw hole on the projector plate cover and tighten it using the 5mm Hex Key (included).
FOR SAFE OPERATIONAL USE, THIS STEP MUST BE COMPLETED
15. Route the cables connected to the projector (e.g. Power Cable, etc.), though the bottom end of the lower pole with cable notch and out through the top.
16. Attach the bottom of the lower pole (with cable notch) to the top of the ball-joint mechanism. Make sure that the mounting holes on the lower pole are aligned with the mounting holes on the ball-joint mechanism.
Note: Route the projector’s power cable through the cable notch in the lower pole before inserting the M6 x 12 mm screws.
17. Insert a M6 x 12 mm Screw (x 3) through each of the mounting holes on the lower pole and into the mounting holes on the ball-joint mechanism.
18. Using the 5 mm Hex Key tighten the M6 x 12 mm screws.
19. Feed the projector cables through the upper pole and slide the upper pole (with the two screw holes facing down) down over-top of the lower pole.
20. Insert the M6 x 65 mm screws ( x2) through the screw holes on the upper pole and the adjustment holes lower poles (at the appropriate height) and into a nut on the opposite side.
21. Using the 10 mm spanner hold the nut on the end of the M6 x 65 mm screw, use the 5 mm Hex Key to tighten the M6 x 65 mm screws.
22. While supporting the weight of the projector and projector mount, slide the upper pole on to the ceiling plate. Making sure that you align the cable notch in the upper pole with the cable notch in the ceiling bracket.
Note: Make sure that all cables are aligned with the ceiling bracket so that they come out the side of the cable notch.
23. Align the mounting holes on the upper pole with the mounting holes on the ceiling bracket.
24. Insert a M6 x 12 mm screw (x 3) through the mounting holes (x 3) in the upper pole and into the mounting holes ( x 3) on the ceiling bracket.
25. Using the 5 mm Hex Key, tighten the M6 x 12 mm screws.